Carryover is one of the quietest ways an autosampler can wreck your data. A trace of analyte left behind from a previous injection shows up in the next one — as an unexpected peak in a blank, or as a low sample reading higher than it should be. In routine work it’s an annoyance; in quantitative LC-MS/MS bioanalysis, trace impurity analysis, or any low-level method, it causes false positives, inflates low concentrations, and can fail a validation outright. The good news: carryover is measurable, classifiable, and almost always fixable at the autosampler.
Step one: measure it
Before changing anything, quantify what you actually have. Inject a high-concentration standard — in bioanalysis, your upper limit of quantitation (ULOQ) — then inject a blank immediately after. The carryover is the analyte peak that appears in that blank, expressed as a percentage of the high injection’s response. This single high-then-blank sequence turns a vague “I’m seeing ghost peaks” into a number you can track as you troubleshoot. For reference, regulated bioanalytical guidelines expect carryover in a blank after the ULOQ to stay at or below 20% of the response at the lower limit of quantitation.
The key distinction: dilution or adsorptive carryover?
Now inject several blanks in a row after the high standard and watch how the carryover behaves. It falls into one of two patterns, and they mean very different things:
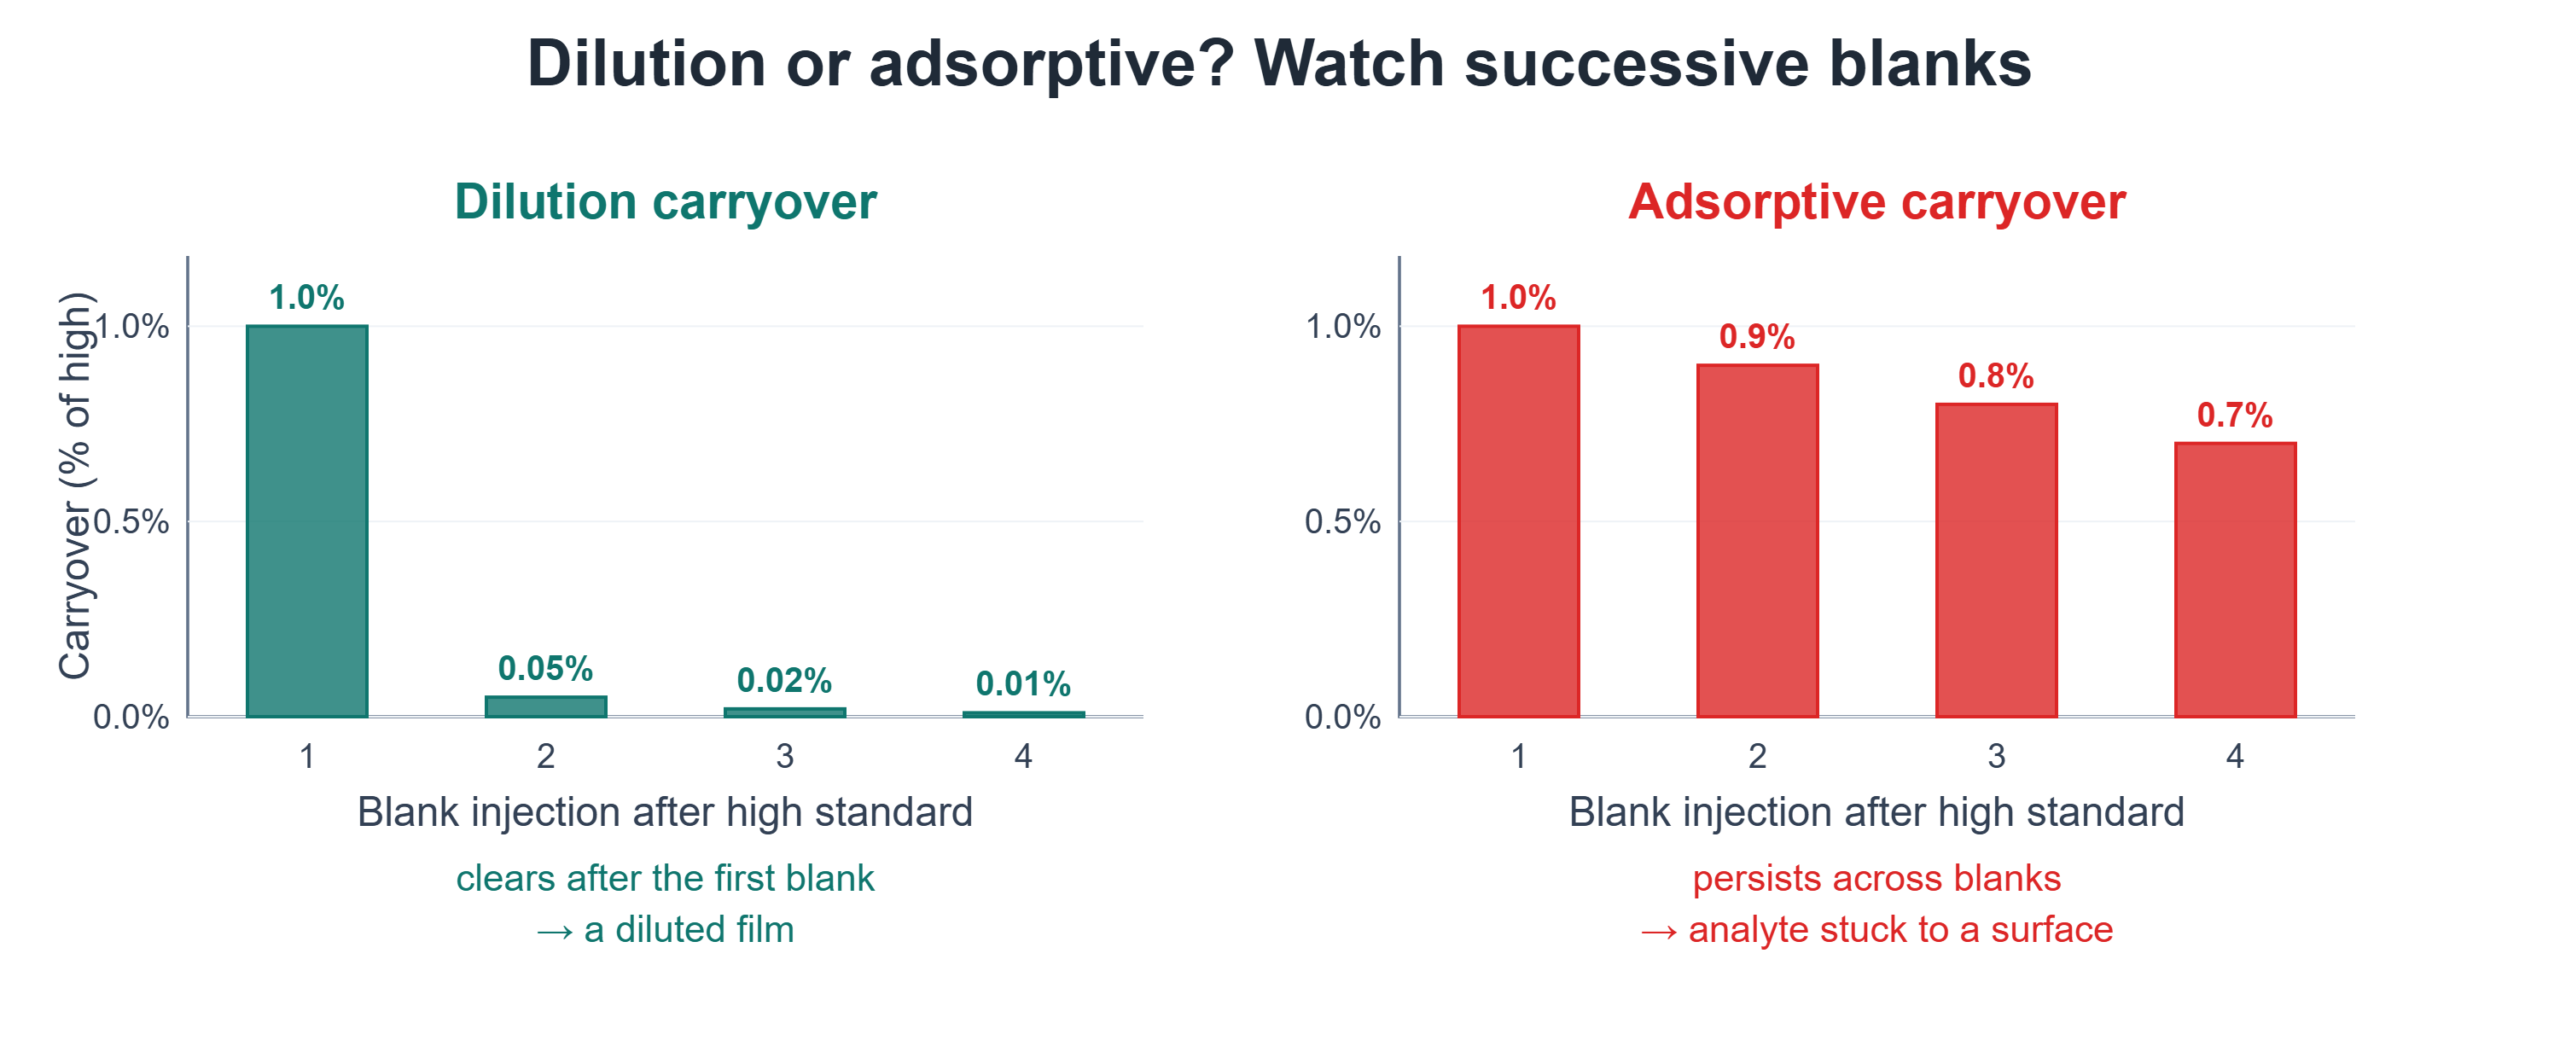
- Dilution carryover clears quickly — a meaningful signal in the first blank, then essentially nothing in the second. It’s a thin film of sample carried mechanically into the next injection and diluted away.
- Adsorptive carryover decays slowly — perhaps 1% in the first blank, 0.9% in the second, 0.8% in the third. Here the analyte has adsorbed onto a surface in the flow path and is released gradually, injection after injection.
Adsorptive carryover is the more important — and more stubborn — of the two, because significant analyte can persist into the second, third, and later blanks. If your carryover lingers across multiple blanks, you’re dealing with a sticky analyte adsorbing somewhere, and the fix is about surfaces and wash chemistry, not just wash volume.
Where carryover comes from
Most autosampler carryover originates at a handful of surfaces the sample contacts:
- The sampling needle — both a film of sample on the outside and analyte adsorbed to the needle surface itself. The single most common source.
- The needle seat and injection port, where the needle docks between injections.
- The injection valve rotor seal, a classic site for adsorptive carryover of sticky compounds.
- The sample loop and connecting capillaries.
- Vials and septa — analyte can adsorb to untreated glass, and torn foil septa wipe the needle poorly.
The primary lever: needle wash
For most methods, the needle wash is where the battle is won. Three things matter:
Wash-solvent chemistry, matched to the analyte. The wash has to actually dissolve what you’re removing. A dual-solvent wash — a strong organic such as acetonitrile or methanol together with an aqueous component — clears both polar and non-polar residue; adding a little acid or base (for example, 0.1% formic or acetic acid) helps with ionizable analytes, and very sticky compounds may need isopropanol, DMSO, or stronger. The right wash solvent routinely drops carryover by an order of magnitude.
An active rinse beats a static dip. Flowing wash solvent past the outside of the needle is far more effective than simply dipping it — one study cut carryover to roughly a third of the no-rinse case with an active rinse. Wash the needle inside and out, and give the wash enough volume and time.
Wash volume and duration. If carryover is close to acceptable, increasing the wash volume or extending the wash step often gets you there.
When the wash isn’t enough
If a well-chosen wash doesn’t clear it, the analyte is adsorbing to hardware. Replace a worn injection valve rotor seal or a contaminated needle seat. Switch to deactivated or silanized vials for analytes that stick to glass, and use polymeric (silicone or PTFE-faced) septa that wipe the needle cleanly rather than foil septa that tear. As a stopgap while you optimize, inserting wash blanks between samples keeps carryover from contaminating real results.
A diagnostic flow you can follow
- Measure it — inject a high standard, then a blank; record carryover as a percentage.
- Classify it — several blanks in a row; clears fast (dilution) vs. decays slowly (adsorptive).
- Optimize the needle wash first — solvent chemistry, then active rinse, then volume.
- If it persists, address hardware — rotor seal, needle seat — and vials/septa.
- Re-measure after each change to confirm you’re actually reducing the number.
The takeaway
Carryover isn’t a mystery to be endured — it’s a number to be driven down. Measure it with a high-then-blank sequence, classify it as dilution or adsorptive by watching several blanks, and attack it in order: wash chemistry first, then wash mechanics, then the hardware and vials where sticky analytes hide. Work that sequence and even demanding LC-MS/MS methods can reach the very low carryover that quantitative work requires.
Related troubleshooting guides: Ghost peaks in HPLC and Losing sensitivity in LC-MS.
Chasing carryover in a quantitative method? LabVeda’s Chromatography Troubleshooting Decision Engine helps you localize the source and choose the right wash strategy.